

Apple Watch SE and Series 4 or later offer Fall Detection. This feature senses hard falls and can initiate a connection to emergency services if necessary.
How Does Fall Detection Work:
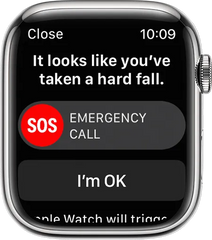
- Upon sensing a hard fall, apple watch vibrates, sounds an alarm, and sends an alert. Users have options to alert emergency services or dismiss the warning using various touch commands.
- If movement is detected post-fall, apple watch waits for user action. If no movement is sensed for roughly a minute, it automatically dials emergency services.
- Post-call, apple watch sends a notification to predefined emergency contacts about the incident. Contacts are sourced from your Medical ID.
- In cases where there are several emergency numbers in an area, the watch picks one.
- Owners of iPhone 14 or 14 Pro can receive notifications through the Emergency SOS satellite system when they are outside conventional signal coverage zones.
Making a call:
- Drag the "Emergency Call" slider to initiate a call to emergency services.
- In case of accidental calls, wait for the responder and then clarify the situation.
Immobility Scenario:
When your Apple Watch senses that you've remained motionless for approximately one minute, it initiates a 30-second countdown. Throughout this countdown, it vibrates on your wrist and activates an auditory alert. As the seconds pass, the volume of this alert increases to ensure either you or someone in close proximity can hear it. If you decide that you don't need to reach out to emergency services, you have the option to tap "Cancel." However, if you allow the countdown to finish without intervention, your Apple Watch will automatically dial emergency services and also send a notification to the emergency contacts you've set up.
Upon successfully connecting the call, your Apple Watch broadcasts an audio message. This message informs the emergency services that a hard fall was detected by your Apple Watch. Following this, it conveys your present location, detailing the latitude and longitude coordinates. If, in the past, you had enabled the "Share During Emergency Call" feature in your Medical ID settings, then your Medical ID information will also be promptly shared with the emergency services. The audio message is played at its maximum volume the first time around. Afterward, its volume is diminished so you or someone near you can converse with the emergency responder. This recorded message will keep playing until either you tap the "Stop Recorded Message" option or the call concludes.
For all these automatic features to function, especially the auto-call to emergency services, it's essential that "Wrist Detection" is activated on your Apple Watch. To ensure this, navigate to the Settings application on your watch, select "Passcode," and then verify that the "Wrist Detection" feature is indeed enabled.
Are Falls Recorded?
Every time you experience a fall, the Health app on your iPhone automatically records it. However, if you respond to your Apple Watch's query by stating that you did not fall, then the incident won't be documented. To review the history of your falls, proceed by opening the Health app on your iPhone. Once inside, select the 'Browse' tab. After that, choose 'Other Data', and from there, you can tap on 'Number of Times Fallen' to see the records.
Toggling Fall Detection:

To adjust the Fall Detection settings on your Apple Watch:
1. First, unlock your iPhone and locate the Watch app.
2. Once you open the Watch app, look for the "My Watch" tab and tap on it.
3. In this section, you will find an option called "Emergency SOS." Please tap on it.
4. Here, you have the ability to either turn on or turn off the Fall Detection feature. Furthermore, if you have activated the Fall Detection, there are two settings available for you to choose from: "Always on" and "Only on during workouts."
5. It's important to note that if you have previously entered your age during the Apple Watch setup process or within the Health app and you are 55 years old or older, the Fall Detection feature will be automatically enabled for you. It's crucial to ensure that the age you've entered is accurate both in your Medical ID and your Health Profile. Remember, the Fall Detection feature is exclusively available to individuals who are 18 years of age or older.
It's worth mentioning that the Apple Watch is not infallible in its Fall Detection capabilities. There might be instances where the watch perceives high-impact activities as falls and subsequently triggers the Fall Detection alert.
Medical ID Setup and Emergency Contacts:

1. Begin by accessing the "Settings" application on your iPhone.
2. Once inside, navigate by selecting "Health." From there, proceed to "Medical ID."
3. Inside the Medical ID section, you'll find an "Edit" option. Please tap on it to proceed.
4. Now, input your date of birth along with any other relevant health-related information you wish to include.
5. If you need to add someone as an emergency contact:
- Locate the "add" button within the "emergency contacts" section.
- Tap on this button, then select the desired contact from your list.
- After selecting, you will have the opportunity to specify their relationship to you.
6. If at any point you need to remove an emergency contact:
- Find the "remove" button situated adjacent to the contact you wish to delete.
- Tap on this button, followed by selecting "Delete."
7. For easy accessibility during crises, you can make your Medical ID viewable directly from your iPhone's Lock Screen. To enable this:
- Activate the "Show When Locked" feature. This ensures that in urgent situations, individuals attempting to assist can access essential information without unlocking your phone.
8. To permit emergency service responders to view your Medical ID:
- Activate the "Share During Emergency Call" option. Consequently, whenever you place a call or send a text to emergency services using either your iPhone or Apple Watch, they will automatically receive your Medical ID details.
9. Once you've completed all desired modifications, remember to finalize your edits by tapping on "Done."
10. Please note that it's not permissible to designate emergency services themselves as an emergency contact in this section.